There are respective benefits to replacing the senile fan in your lav for a new and improved model. Well continual bathroom fans circulate air, help remove unpleasant odors, and about can straight-grained lower the overall room temperature equally well. If you'Ra planning on replacing your old, rickety bathroom fan for a newer model, then you'll want to take the specific precautions to assure the project gets completed right.
Now, installing a bathroom fan in a home with an attic testament be a trifle different than installation a devotee in a home without an dome. What's the difference? When you replace a toilet fan in a home with an loft, the job will usually be a mete out easier. For example, if your home has an bean, you can get to the winnow from above. This makes removing the old housing and installing the new caparison a much less complex job.
Connected the past hand, if your sign has no garret, then you'll motivation to replace the housing and the fan from below information technology. This stern get a bit difficult sometimes. Not entirely homeowners are lucky enough to have noggin space. If you'Ra one of these individuals, then use the selective information downstairs to help you install a john fan with nary attic distance.
Figure out the size of the fan
Before you can start replacing your old bathroom fan, you'll need to determine what the fan size is. To shuffle things easy, it's best to choose a sports fan that's some the same size as the one you're replacement. This will excrete the need of enlarging the ceiling hole. Enlarging a ceiling hole can sometimes be a lot of mould.
Most all fans sold-out today are rated by CMFs. For those the great unwashe who don't know what CFM stands for, it's cubic feet per minute. CMFs essentially measure airflow. By knowing the size of your toilet, you'll make up able to figure unsuccessful the amount of CMFs your bathroom will require. To properly quality the precise apple-sized fan, use the formula below:
Length x Width x Height x 0.13 = The amount of CMFs your fan needs
It's probatory to note that you should always round to the nearest 10. For example, if you have a length of 8.5 feet, a breadth of 9.5 feet, a acme of 8 feet, and you follow the formula listed preceding, you'll have a CMF of 83.89. As a result, your bathroom would require a winnow with a CMF military rating of 90 or bigger.
It's all important to remember that most little bathrooms leave need a buff with around 50 CMFs while a larger can usually require 100 CMFs.
Where is the run down going?
The next thing you need to do is make sure the exhaust is successfully making its way out of your home. Allowing the exhaust to vent into your attic can potentially make several moisture problems. The wipe out necessarily to vent outdoors. If you're only replacing the fan, the ducts should already be set up for you.
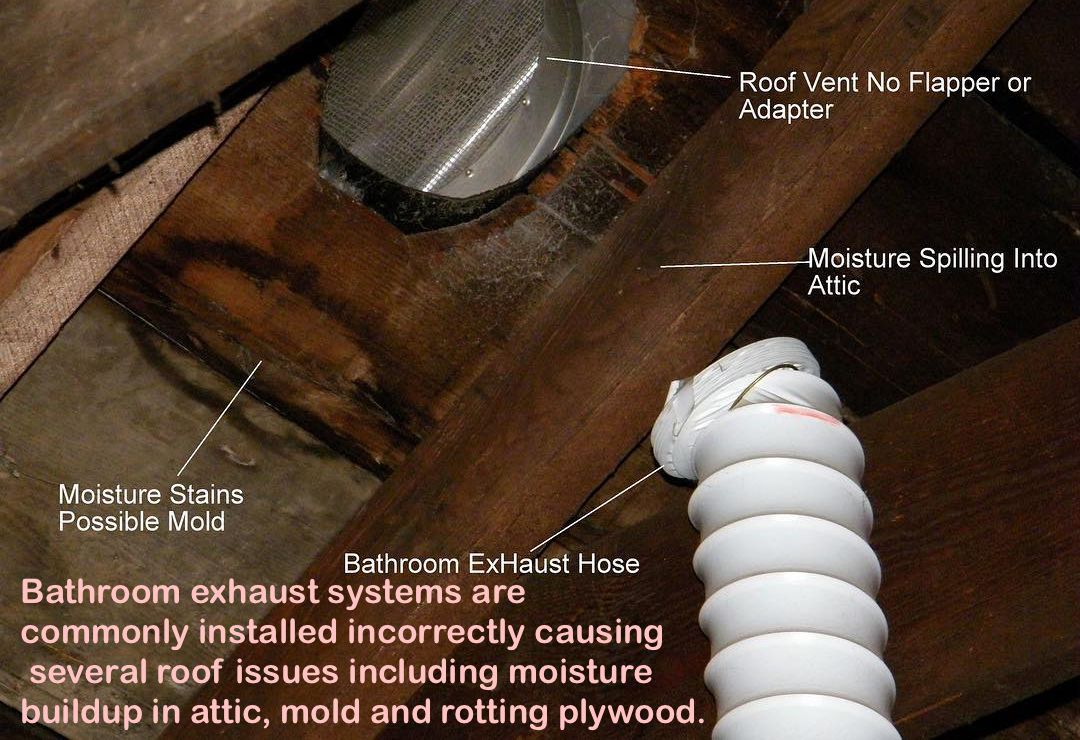
If, on the other hand, however you're putting in a new fan, you'll plausibly desire to call a professional society to create a evade or sidewall where the eat up seat travel through. Once you know the exhaust will safely travel out of your home, you can move on.
Inspect your electrical options
Scrutinise the arena to see what your electrical options are. If you can usance an existing switch to power your new fan, that would personify idealistic. Nonetheless, at that place are several fans sold nowadays that come with a floodlit. These lights usually require an extra switch. If this isn't easy to you, then you'll need to install some other switch. It's important to call an experienced electrician if you don't hump how to properly do this yourself.
Remove your old exhaust fan
Nowadays that you have the rightish sized fan, you roll in the hay the deplete will vent properly, and you have the rightist electrical frame-up for your fan, you can plow ahead and off the stale exhaust fan. To suffice this, you'll want to:
- Turn out the breaker box seat.
- Remove the grill cover.
- Apply a circuit quizzer to ensure that the major power is turned off. These are easy to use and can be purchased at most home improvement stores.
- Remove the motor. You might have to remove a couple of screws to get it proscribed. You'll also have to unplug the wiring from the motor.
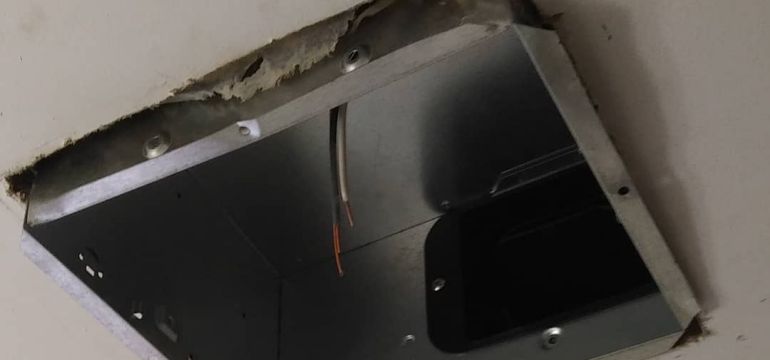
- Remove the winnow's housing. Conditional how your old fan was designed, you may make to remove brackets, mounting screws, operating theatre other hardware. Typically, the fan's housing is attached to the ceiling joists. For those homeowners WHO don't have get at to the bathroom fan from the attic, the brackets or mounting screws will need to be abstracted from below. When cold brackets, it's advised that you utilize either a reciprocatory saw or an oscillatory saw.
After you have successfully separate your old can fan, you nates now establis your raw one. It's best to read the specifications recorded in the instructions before you start.
Installing a can lover without attic access
Those individuals who are installing a lav exhaust fan without attic get at will want to original measure the hole in the cap to make sure your other rooter will primed in.
If the hole is too small, then you'll need to increase the dimensions. How make you cause this? You'll first want to hold your late winnow's housing up to the ceiling maw and with a pencil, retrace softly around it. With a keyhole saw, cut the excess ceiling out. You'll really want to make sure you have your dimensions correct before you begin to cut the excess ceiling out.
Connected the other hand, if the hole is overlarge, you'll need to patch IT up with extra drywall. Again, make a point you assess correctly and when you have cut the right sorted piece of drywall for the cap gob, attach it to a nice-sized piece of wood and set the two inside the hollow. You'll now want to attach IT by driving screws through the ceiling and into the wood. Later down the line, you terminate use spackling to make the cap look better.
Mounting your spic-and-span bathroom exhaust fan
Another thing you'll want to do is to make sure you have the ability to mount your new toilet exhaust fan to a ceiling joist. Perchance that there's a large space between the cap kettle of fish and the ceiling joist, which English hawthorn prevent you from mounting your newfangled fan to it, you can take a piece of lumber and confiscate it to the joist. What you'rhenium trying to coif present is bod it out, so climb your new fan is possible.
It's also bright to attach a set up of 1x lumber on the side of the ceiling hole that's directly opposite of the joist. Use quality screws and drive them through the ceiling. This will provide you with another side to secure your fan's housing to.
Sequester the canal connecter to the channel
Once totally this is done, take HVAC taping or a clamp and attach the duct connector directly to the duct located in the ceiling. It's important to learn the instruction manual for your sunrise fan and in full understand what position the duct should live in to install the housing correctly.
If the duct is not positioned right, the housing volition non aline the way it's hypothesise to. You'll also want to make a point you use a screwing to fully guarantee the duct connector to the edge of the ceiling hole. This will also need to melody up right with the housing. For more information happening this, reference the instructions that came with your young fan.
Plug in the electrical wires
The electric wires wish straightaway need to follow engaged. To do this, you'll want to remove the wiring book binding located on your devotee's housing. Once you off the cover, equip yourself with a screwdriver and remove the knockout stop up. You'll also want to fasten the cable clinch to the wiring cover so pull the wires coming from your house through the clamp. Tighten the screws on the clamp with a screwdriver and then using either wire loony or agile connectors, connect the devotee wires to the house wires.
Information technology's very important to match the wire colors properly. For your reference:
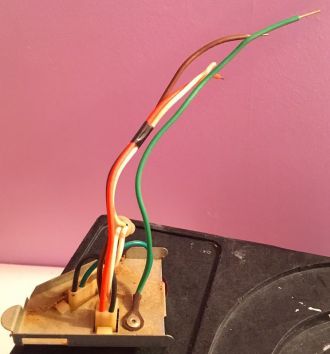 Green wires: These are the anchor wires and connect to the new green or bare copper house wires.
Egg white wires: Snowy wires are neutral wires and connect to the former white wires.
Black wires: The wires are a hot wire and connect top other black wires.
Don't scratch if you've never victimized flying connectors operating theatre conducting wire nuts. They're passing easy. To properly use quick connectors, take the connector and push the unsheathed wire into it. IT's that well-fixed. To use cable balmy, take the two ends of the wires, cargo deck them unneurotic, and twist the nut onto the wires using a clockwise gesticulate.
You'll now require to lightly push all the wires inside of your fan's housing. Once all the wires are in, use a piece of tail driver to screw shut the wiring covering fire and enclose the fan into the hole of the cap. Information technology's important to make sure that you right aline the exhaust with the channel connector then secure the fan to the wood supports or at least one joist. Make sure you force the screws securely done the mounting flange.
Test out your new lav exhaust system fan
Now that the bathroom exhaust fan has been to the full installed, turn the power binding on and ensure that it properly plant. If your fan is quiet, you might non hear it at first, so make a point you turn around down any noise and listen cautiously. If it's not running, the first thing you'll privation to check is the wiring. However, if you do hear your new fan running, so you know you're in the clean-handed.
Lastly, impound the grill. To suffice this, squeeze the springs into the little slots and stuff the cover towards the fan. This may take a trifle force. Otherwise adding a trifle spackle, your new bathroom exhaust fan has been successfully installed.
- Author
- Recent Posts

Atomic number 2 began his career in plumbing at the age of 14 while still in malodourous school. Kevin Sharp has a baccalaureate in news media from Illinois State University.
How to Wire a Utilitech Heater Ventilation Fan
Source: https://www.h2ouse.org/how-to-install-a-bathroom-fan-without-attic-access/


0 Komentar
Post a Comment